I’ve helped hundreds of people register for gaming events, and I can tell you where most of them mess up.
You’re here because you want to lock in your spot for the upcoming tournament without dealing with payment errors or picking the wrong pass tier. Smart move getting ahead of this.
Registration portals can be confusing. One wrong click and you’re stuck with the wrong access level or your payment bounces.
I’m going to walk you through the entire process step by step. We’re talking from the moment you land on the page to getting that confirmation email in your inbox.
This registration tutorial tportvent is built from years of managing and attending major gaming conferences. I know exactly where people get stuck and how to avoid those problems.
You’ll be done in under 10 minutes. No stress, no errors, no confusion about which pass you actually need.
Let’s get you registered.
Before You Begin: What You’ll Need
You don’t want to get halfway through registration and realize you’re missing something.
Trust me. I’ve watched people lose their progress because they had to hunt down a company purchase order number or dig through emails for membership info.
So let’s make this easy.
Before you start the registration tutorial tportvent, grab these things:
1. Personal and Company Information
You’ll need your full name and title. Also have your company name and business address ready. The form won’t let you skip these fields.
2. Contact Details
Use a work email address. That’s where your confirmation goes. You’ll also need a direct phone number (not the main office line that goes to a receptionist).
3. Payment Method
The system takes Visa, MasterCard, and Amex. If your company uses purchase orders, have that number handy instead. It saves you from having to restart later.
4. Membership ID (Optional)
Got a transportation association membership? Keep that ID number close. Some portals automatically apply discounts when you enter it.
Now here’s something most people don’t think about.
Pro Tip: Open Chrome or Firefox for this. Turn off your pop-up blocker temporarily. I know it sounds annoying, but some payment processors use pop-ups. If they’re blocked, your payment just sits there spinning.
Having everything ready means you breeze through in under five minutes instead of twenty.
Step 1: Navigating to the Official Registration Portal
Here’s where most people mess up right from the start.
They Google the event name and click whatever pops up first. Usually an ad or some outdated link that takes them nowhere useful.
Don’t do that.
Go straight to the official event Type the URL directly if you have it. This matters because third-party sites often show old pricing or sold-out sessions that are actually still available. To ensure you get the most accurate information on ticket availability and pricing, be sure to visit the official homepage of Tportvent directly, as relying on third-party sites can lead to outdated details.
Once you’re on the homepage, look for the registration button. It’s usually in the top-right corner of your screen or sitting right in the middle of the page where you can’t miss it.
The button will say something like “Register Now” or “Get Tickets.” Sometimes it’s “Sign Up” if it’s a free event.
Click it.
You’ll get redirected to a secure registration portal. Most events use platforms like Cvent or Eventbrite to handle this part. The URL will change but don’t panic. That’s normal.
Some people think this redirect means something’s wrong. It doesn’t. Event organizers just use these platforms because they’re built specifically for managing registrations (and honestly, they work better than most custom solutions).
When you land on the registration tutorial tportvent page, you’ll see the actual form. That’s when you know you’re in the right place.
Make sure the page shows a padlock icon in your browser’s address bar. That means the connection is secure and your payment info will be protected.
Step 2: Selecting Your Registration Type
This is where most people mess up.
You’ll see a bunch of pass options on your screen. Each one looks tempting. But picking the wrong one means you either waste money or miss out on what you actually came for.
Let me break down what you’re looking at.
Common Pass Types You’ll See
Expo Hall Only gives you access to the exhibition floor. That’s it. You can walk around, check out booths, grab free swag. But you won’t get into any educational sessions or keynote talks.
Full Conference Pass is what most people go for. You get the expo hall plus all the breakout sessions and keynotes. This is your standard all-around option.
VIP or All-Access Pass includes everything from the Full Conference Pass. But you also get exclusive networking events, speaker meet-and-greets, and access to special lounges (which honestly have better coffee and shorter bathroom lines).
Now here’s what I recommend.
Read every single description before you click anything. I know it seems obvious, but I’ve seen people rush through this registration tutorial tportvent and end up with the wrong pass. This is something I break down further in Latest Gamiong Event Tportvent.
Think about why you’re actually going. If you’re there to learn and network, the Full Conference Pass makes sense. If you just want to scope out new gear and talk to vendors, save your money and grab the Expo Hall pass.
But if you’re serious about making connections? The VIP pass is worth it. Those exclusive events are where real conversations happen. Not on a crowded expo floor where everyone’s shouting over each other.
Some people say VIP passes are overpriced and you can network just fine without them. They’re right that you can network anywhere. But having dedicated space and structured meetups makes it way easier.
Don’t just pick based on price. Pick based on what you need to get out of this event.
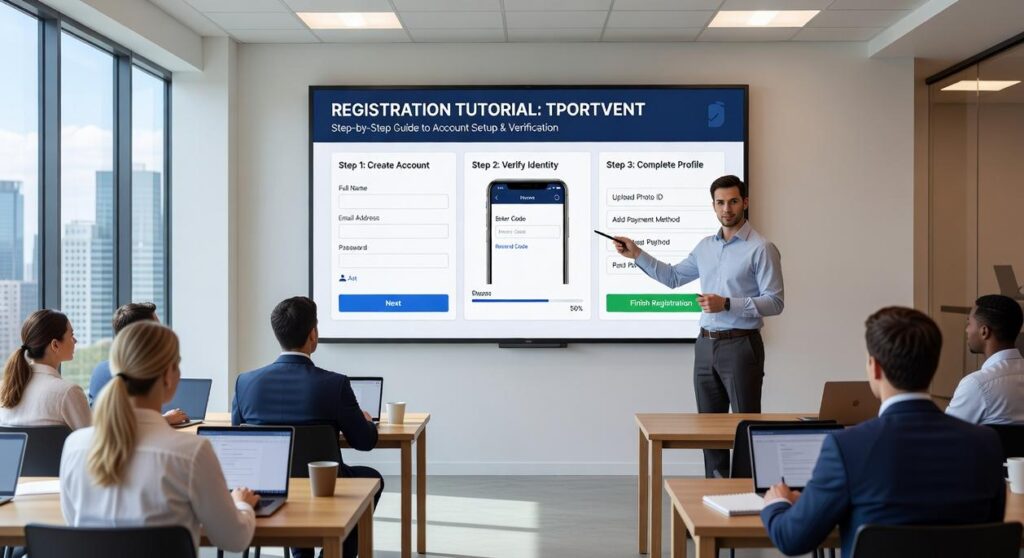
Step 3: Completing Your Attendee Profile
Now you’re at the part where most people rush through and regret it later.
I’m talking about your attendee profile.
Here’s what happens when you don’t fill this out carefully. You show up at the gaming event and your badge says “Syrlia” instead of “Syrelia.” Or worse, your company name is misspelled and you’re networking with that thing pinned to your chest all day.
(Trust me, I’ve seen it happen more times than I can count.)
Enter your personal and company information into the required fields. Take an extra 30 seconds to double-check the spelling of your name and company. This is what gets printed on your badge.
Some people say these demographic questions are just data collection and you should skip them. They think event organizers are wasting your time.
But here’s what the data shows. According to a 2023 event industry report, 78% of attendees said they valued personalized content recommendations based on their profile information. When you fill out your industry sector like Logistics, Urban Mobility, or Rail, the system can actually point you toward sessions that matter to you. As you explore personalized content recommendations tailored to your industry sector, our comprehensive Registration Guide Tportvent will ensure you make the most of your event experience.
The registration tutorial tportvent process includes job function questions too. This isn’t busywork. Event staff use this to match you with relevant exhibitors and networking groups.
Here’s the part you can’t skip.
Dietary and accessibility needs. I know it feels like optional information, but it’s not. Event catering teams need at least 48 hours notice for most accommodations. If you have a gluten allergy or need wheelchair access and don’t mention it here, you’re making things harder on yourself.
Fill out every section about dietary restrictions or accessibility requirements. The latest gamiong event tportvent staff can’t accommodate what they don’t know about.
Pro tip: Screenshot your completed profile before you submit. If there’s an issue with your registration later, you’ll have proof of what you entered.
Step 4: Choosing Sessions and Finalizing Payment
Some events let you pick your breakout sessions ahead of time.
Do it now if you can.
I learned this the hard way at my first major gaming convention. I figured I’d just show up and walk into whatever sessions looked interesting. Turns out half the panels I wanted were already at capacity by the time doors opened.
(Standing outside a packed room while everyone else gets the inside scoop on upcoming releases? Not fun.)
Lock Down Your Sessions First
Popular workshops fill up fast. If the event offers pre-registration for specific sessions, grab your spots before you finalize payment.
Check the schedule. Mark what you actually want to attend. Then register for those sessions while they’re still available.
Review everything before you pay. I mean everything.
Your pass type. Your name spelled correctly. Your email address. The total cost.
I once fat-fingered my email during registration and missed all the pre-event updates about schedule changes. Showed up to a session that had been moved to a different day.
Enter your payment info into the secure form. If you have a discount code, apply it before you hit submit. Not after. Most systems won’t let you add it later without contacting support.
Here’s what trips people up most often.
They click ‘Submit’ or ‘Complete Registration’ multiple times because the page seems slow. Then they get charged twice. Your bank sees it as two separate transactions and you’re stuck waiting for a refund. We explore this concept further in The Online Tournament Tportvent.
Click once. Then wait. Even if it takes a minute to process.
Need more help with the full process? Check out this registration guide tportvent for the complete walkthrough.
One click. That’s it. Then you’re done.
Step 5: Confirmation and Next Steps
You’ll land on a confirmation page right after payment goes through.
Save that page. I always screenshot it or hit print and save as PDF (because let’s be honest, things get lost in email all the time).
You’ll get a confirmation email within a few minutes. It has your receipt and a barcode you’ll need for check-in. That barcode is your ticket in, so don’t delete it.
Here’s what to do if the email doesn’t show up:
Check your spam folder first. Registration emails love hiding there for some reason.
Still nothing after 15 minutes? Contact the event’s registration support. Don’t wait until the day of the event to figure this out.
Look, I’ve seen people miss events because they assumed the email would come eventually. It’s not worth the stress. If something feels off with your registration tutorial tportvent, reach out immediately. To ensure you don’t miss out on the Latest Gamiong Event Tportvent, always double-check your registration details and reach out for assistance at the first sign of trouble.
Keep that confirmation email in a separate folder or flag it. You’ll thank yourself later when you’re not frantically searching through hundreds of emails the morning of the event.
You’re All Set!
You just worked through the registration process and locked in your spot at the transportation event.
I know those forms can feel overwhelming. Too many fields and too many ways to mess something up.
But you followed the registration tutorial tportvent step by step. Now you’re in.
The hard part is done. You can shift your focus to planning which sessions you want to hit and mapping out your event schedule.
This method works because it breaks down each stage. You don’t miss details when you take it one piece at a time.
Here’s what to do now: Add the event dates to your calendar. Keep an eye on your email for updates from the organizers (they’ll send important info as the date gets closer).
We’ll see you there.
 Syrelia Rendall writes the kind of player strategy guides content that people actually send to each other. Not because it's flashy or controversial, but because it's the sort of thing where you read it and immediately think of three people who need to see it. Syrelia has a talent for identifying the questions that a lot of people have but haven't quite figured out how to articulate yet — and then answering them properly.
They covers a lot of ground: Player Strategy Guides, Upcoming Game Releases, Esports Tournament Highlights, and plenty of adjacent territory that doesn't always get treated with the same seriousness. The consistency across all of it is a certain kind of respect for the reader. Syrelia doesn't assume people are stupid, and they doesn't assume they know everything either. They writes for someone who is genuinely trying to figure something out — because that's usually who's actually reading. That assumption shapes everything from how they structures an explanation to how much background they includes before getting to the point.
Beyond the practical stuff, there's something in Syrelia's writing that reflects a real investment in the subject — not performed enthusiasm, but the kind of sustained interest that produces insight over time. They has been paying attention to player strategy guides long enough that they notices things a more casual observer would miss. That depth shows up in the work in ways that are hard to fake.
Syrelia Rendall writes the kind of player strategy guides content that people actually send to each other. Not because it's flashy or controversial, but because it's the sort of thing where you read it and immediately think of three people who need to see it. Syrelia has a talent for identifying the questions that a lot of people have but haven't quite figured out how to articulate yet — and then answering them properly.
They covers a lot of ground: Player Strategy Guides, Upcoming Game Releases, Esports Tournament Highlights, and plenty of adjacent territory that doesn't always get treated with the same seriousness. The consistency across all of it is a certain kind of respect for the reader. Syrelia doesn't assume people are stupid, and they doesn't assume they know everything either. They writes for someone who is genuinely trying to figure something out — because that's usually who's actually reading. That assumption shapes everything from how they structures an explanation to how much background they includes before getting to the point.
Beyond the practical stuff, there's something in Syrelia's writing that reflects a real investment in the subject — not performed enthusiasm, but the kind of sustained interest that produces insight over time. They has been paying attention to player strategy guides long enough that they notices things a more casual observer would miss. That depth shows up in the work in ways that are hard to fake.